
 Search


REMINDER: Access Credit Union will never contact you for your personal information via text, unsecure email, or social media channel. For your own online security, please do not action any email, text message, or otherwise, that appears to have been received from Access Credit Union without discussing with an Access Credit Union representative to ensure legitimacy.
Learn How to Use Business Digital Banking

Desktop and Tablet
Desktop and Tablet
Business Digital Banking users can access their accounts on desktop computers or tablets by selecting the 'Sign In' button on the Access Credit Union website.


Frequently Asked Questions
Frequently Asked Questions
Need help with something specific? We've compiled the most common questions about digital banking.
How to use Business Digital Banking on Desktop or Tablet

Getting Started
![]()
Getting Started
Learn how to log in to desktop online banking for the first time, manage signers and delegates, and consolidate accounts

Transactions
![]()
Transactions
Learn how to send and schedule transfers, bill payments, and Interac e-Transfers®, as well as view and manage transactions (including dual-signature), set favourites, and view eStatements.

Office Banking
![]()
Office Banking
Learn how to use common office banking features, like how to check your statements, and make tax payments.

Settings & Security
![]()
Settings & Security
Learn how to reset your password, retrieve your username, and set up alerts.
Getting Started


Logging in to the new business digital banking for new users.
- Log in to your account via ONLINE BANKING (DESKTOP OR TABLET):
Visit accesscu.ca and select the Sign In button to begin.
- Enter your business debit card PAN (that’s the 16 or 19 digits on your debit card).
Select the Continue button to proceed.
- Select the calendar icon next to the Date of Birth field to choose your date.

- Enter your mobile phone number or email to receive an authentication code.
Select Continue to proceed.
- Enter the confirmation code you received, then select Confirm button to continue.
If you do not receive your verification code, please check your junk or spam mail folder.
If the code does not arrive within 10 minutes, you can request a new one.
If you receive more than one verification code, enter the most recent code you received.
If you still do not receive a code, please contact us for assistance.
- Select Continue to proceed.

- Choose a unique username* using up to 34 characters. Enter it in the designated input field.
IMPORTANT: Please note that once you’ve selected a username, it cannot be changed. Be sure to verify that your username is appearing correctly before continuing.
- The guidelines for your unique username are:
- minimum 5 characters
- maximum 34 characters
- cannot be your debit card number
- cannot be your email address
- can use uppercase letters, lowercase letters, numbers, and/or the underscore and period (_ .) special characters
*If there is another member in our system with the same username, it will be rejected and you’ll have to select a new one.
- The guidelines for your unique username are:
- Choose a unique password using the following criteria:
- Alphanumeric
- Minimum 10 characters
- Maximum 35 characters
- 1 uppercase letter
- 1 lowercase letter
- 1 number
- 1 symbol (this is not displayed on the password indicator but is allowed)
- dash -
- underscore _
- period .
- at symbol @
Enter your new password in the designated password field. Then, re-enter the same password in the confirmation field to verify it.
- Alphanumeric
- Check the box labeled “I have read and accept the Direct Service Agreement.”
Then, select the Continue button to proceed.
-
Select the Create user profile button to continue.

- Select the Proceed to Sign In button to continue.

You're all set! You can now sign in using your new username and password.
Add a profile picture
1. Navigate to the My Access tab in online banking. Under Settings, select Profile Details to upload your image.

2. To add a photo, select the camera icon.
Choose your picture, then select Add to upload it.

3. Select the Save button to apply your changes.

4. The profile picture is added

Add a Delegate
- Under Business services, select Delegate management.

- Select the Add delegate button to begin. You can add as many delegates as needed.

- Enter the Delegate username and Delegate name in the appropriate fields as part of the signer setup process.

- Assign your delegate’s Access level. You can choose either Read-only or Initiator access.

- Enter your delegate’s email address or mobile number in the appropriate field so they can receive their password. Then re-enter the same information to confirm.

- Confirm that your delegate has agreed to act as a delegate by checking the consent box, then select Continue button to proceed.

- Confirm the delegate details. If the information is correct, select the Continue button. If you need to make changes, select the Back button.

- You will receive a seven-digit authentication code. Enter the code in the input field, then select the Continue button to proceed.

Your delegate will now be added. A temporary password will be sent to your delegate, but for security purposes you’ll also need to send the delegate their username in a separate communication.
Once created, delegates cannot be deleted (but you can lock their access). If you make any changes to your delegate access later, they will immediately come into effect.
Lock & unlock Delegate access
- Under Business services, select Delegate management.

- Find your delegate in the list and use the Lock access toggle to turn access on or off.

Your delegate will still be listed after they are locked, and you can reactivate them at any time.
Access Level: You can choose between initiator and read-only permission for your delegates. Read-only delegates can’t make transactions. Initiator delegates can set up transfers and payments, but require a signer’s approval.
Reset a Delegate password
After five failed password attempts, your delegate will be locked out of their account. If this happens, your delegate can choose Forgotten password on the login screen to reset their password. Or, you can use the Reset password feature shown here to allow your delegate additional login attempts with their existing password.
- Under Business services, select Delegate management.

- Find the delegate in the list and select Reset password.

Lock access: Prevents a delegate from accessing digital banking. Your delegate will still be listed after they are locked, and you can reactivate them at any time.
Edit Delegate details
- Under Business services, select Delegate management.
- Find the delegate in the list and select the Edit details icon. You can edit:
• Delegate Name
• Access level (initiator or read-only)
• Email and/or mobile phone number
• Delegate notes (other owners can also have access) - Make the necessary changes and select Continue button.
- Verify details and select Continue button.
- As an extra layer of security, we’ll send an authentication code through email or text to confirm your request. Once you enter the authentication code you received over email or text, your delegate’s information will be changed.
Unlock transaction authentication: Allows the signer to reset a delegate’s security credentials after they have been locked out of their account. Delegates will get locked out of their account if they enter an authentication code incorrectly three times.
Profile consolidation
Profile consolidation gives you full access to all of your personal and business memberships with a single username and password, which means you can switch between profiles without logging out. Profile consolidation is only available to account signers.
Before consolidating, you will have to log in separately under both personal and business online banking. Also, you can only consolidate through your business profile, not your personal profile.
Add a Profile to your account
- Sign in to your business online banking account.
Under Business services, select Profile consolidation.
- Select Add profile button.

- Enter the Username and Password in the input fields for the business or personal profile you want to add, then select the Continue button.

- Confirm the account details and select Continue button.

Profile consolidation: This is a profile setting that allows you to view or initiate transactions for all your Access memberships with a single username and password.
Delete a consolidated profile
- Sign in to your business online banking account.
- Under Business services, select Profile consolidation.
- Find the profile you’d like to delete, select the trash bin icon, and press Continue button.
- Confirm the account details and select Continue button.
Transactions
Transfer to another Access CU member
- From the My Access page, navigate to the Transfers & Payments dropdown menu. Select Transfer Funds from the Transfers section.

- In the Transfer from section, select which account you would like the funds to come out of.

- In the Transfer to section, select Another Access CU member from the available options.
Then, enter the member’s account number in the provided input field.
- In the Transfer details section, enter the Amount you wish to transfer in the designated field.
Select whether this transfer is to be done immediately, scheduled for another time, or set to recurring
Optional: Enter a message for recipient
Select the Continue button to move to the next step.
- Confirm transfer details and select Continue button to move forward.

- This type of transaction requires an authentication code, which will be sent to your registered email address or mobile phone number. Once you receive the code, enter it in the designated field and select the Continue button to proceed.

- Transfer successfully completed. Some transactions may require dual-signatures. Please see the "Dual-signature transactions" tutorial to see how to proceed.

Send an immediate transfer
- From the My Access page, navigate to the Transfers & Payments dropdown menu. Select Transfer Funds from the Transfers section.

- In the Transfer from section, select which account you would like the funds to come out.

- In the Transfer to section, select My account, and select which account you would like the funds be transferred to.
In the Transfer details section, enter the Amount you wish to transfer. Then, select Immediate as the transfer type.
When you're ready to proceed, select the Continue button.
- Review the transfer details carefully to ensure everything is correct. When you're ready to proceed, select the Continue button to move forward.

- A confirmation that the transfer has been successfully completed will be displayed.
Schedule a transfer
- From the My Access page, navigate to the Transfers & Payments dropdown menu. Select Transfer Funds from the Transfers section.

- In the Transfer from section, select which account you would like the funds to come out.

- In the Transfer to section, select My account, and select which account you would like the funds be transferred to.
In the Transfer details section, enter the Amount you wish to transfer. Then, select Schedule as the transfer type, and choose the date you would like the transfer to be processed.
When you're ready to proceed, select the Continue button.
- The transfer details will be displayed for you to confirm details, then select the Continue button.

- A confirmation that the transfer has been successfully completed will be displayed.
Set a Recurring Transfer
- From the My Access page, navigate to the Transfers & Payments dropdown menu. Select Transfer Funds from the Transfers section.

- In the Transfer from section, select which account you would like the funds to come out.

- In the Transfer to section, select My account, and select which account you would like the funds be transferred to.
In the Transfer details section, enter the Amount you wish to transfer. Then, select Recurring as the transfer type. After that, choose the Transfer frequency, Start date, and End date to define how often and for how long the transfer should occur.
When you're ready to proceed, select the Continue button.
- The transfer details will be displayed for you to confirm details, then select Continue button.

- A confirmation that the transfer has been successfully completed will be displayed.
Set Up Favourite Transactions
Through online banking or our mobile app, you can easily set a favourite transaction to use again. This feature allows you to quickly repeat a transaction without re-entering the details, making the process faster and more convenient for all users.
To set up a Favourite Transaction:
- Immediately after completing a transaction that you’d like to save as a favourite (for example, a transfer from Chequing to Savings), select the Add Favourite icon.

- Select the Favourite Name box, and enter a name for your transaction.

- Select the Add to favourites button to complete adding the transaction to your favourites.

To view and use current Favourite Transactions:
- To access your favourite transactions, go to the Accounts tab. Then, select Favourite Transactions from the available options under Accounts.
- If you wish to use a favourite transaction select the Use icon.
- Make any changes you require and select Continue button.
- Confirm the details and select Continue button.
- The transaction is complete.
Add a payee
- Select Transfers & Payments from the navigation menu. Then, within the Payments section, choose Manage Payees to add a new payee.

- Select the Add Payee button by its label to begin adding a new payee.

- To search for a payee, enter a keyword—such as the name of a company or service (e.g., Mastercard or Bell MTS)—into the Payee Name field. As you type, a list of matching payee options will appear.
Select the correct Payee from the list of options.
- Enter the Payee Account Number in the designated input field. Once completed, select the Continue button.

- Review and confirm the Payee Details displayed on the screen. Once verified, select the Continue button to proceed.

- This transaction requires authentication. A verification code will be sent to your registered email address or mobile number. Once you receive the code, enter it into the Authentication Code field and select the Continue button to proceed.

Send or schedule a bill payment
- Select the Transfers & Payments option from the navigation menu.
Then, within the Payments section, choose Pay Bills to proceed.
- Select which account you would like to pay from.

-
In the Amount field next to the selected Payee, enter the payment amount.
Then, use the Payment date selector to choose the date you wish to make the payment.To pay a bill today, select the current date from the calendar.
-
Select the Continue button to proceed.

- Review and confirm the Payment Details displayed on the screen. Once verified, select the Continue button to proceed.

- Payment Successfully Completed.
Set up a recurring bill payment
- From the My Access page, select the Transfers & Payments option from the navigation menu.
Then, within the Payments section, choose Pay Bills to proceed.
- Select which account you would like to pay from.
Then, to set up a recurring payment, select the Schedule recurring payments icon.
-
In the Payee Name field, select the desired payee from the list of available options.Enter the payment Amount in the appropriate input field.Choose a Payment Frequency from the available options (e.g., weekly, monthly).Select both a Start Date and an End Date using the date picker.When all details are entered, select the Continue button to proceed.

- Review and confirm the payment details displayed on the screen. Once verified, select the Continue button to proceed.

- Payment Successfully Completed.
Dual Signature Transactions
Instructions for how a delegate can initiate and review transactions such as bill payments and Interac e-Transfers®.
- Once you have completed a transaction, you should receive the message "This step was successful. For the transaction to be completed, it requires additional approval(s)."
If an account signor has activated their alerts, they will then receive a message that a transaction is pending their approval.
- To review a transaction, navigate to the Business Services section and select the My transactions option.

- Here you can review your pending transactions, and confirm if they been approved by an account signor.
Note: Transactions must be approved within seven days, or they will expire.
- To view all pending transactions for the business, navigate to the Business Services section and select the Pending Transactions option.

- Select the Pending third-party approval column to see all pending transactions.

If you have your membership set up as requiring two-signer approval for transactions like bill payments and Interac e-Transfers®, you can approve the transaction within digital banking.
- Navigate to the Business Services section and select the Pending Transactions option.
Note: You can sign up to receive alerts when there is a pending transaction requiring approval. Transactions expire after seven days.
- To approve a transaction, select the Approve button located next to the transaction. This button is visually represented by a green checkmark icon.
To review transaction details before making a decision, select the Details button (often shown as a right-facing arrow), then choose either Approve or Decline.
- After selecting the Details button (visually represented by a right-facing arrow icon), you will be able to review the transaction information. From this screen, choose either the Approve or Decline button to proceed.

Add Interac e-Transfer® contact
-
From the My Access page, open the Transfers & Payments dropdown menu using its label.
Then, under the Interac e-Transfer® section, select Manage Contacts.
-
On the Manage Contacts page, select Add Contact to begin adding a new Interac e-Transfer® contact.

-
Enter the contact’s Name, Email, and/or Mobile Phone Number in the input fields.
Then, select the Notification Method your contact will use to receive Interac e-Transfer® alerts.
- Enter a Secret Question and its Answer in the input fields.
Note: this should be communicated to the contact separately.
Re-enter the Answer to confirm.
Select the Continue button to proceed.
- Review and confirm the Contact Details displayed on the screen. Once verified, select the Continue button to proceed.

- This action requires two-factor authentication. Enter the verification code sent to your registered mobile device or email address, then select the Continue button to proceed.

- Contact successfully added.
Send Interac e-Transfer®
-
From the My Access page, open the Transfers & Payments dropdown menu using its label.Then, under the Interac e-Transfer® section, select Send Money.

- Select the account you would like to transfer from by choosing it from the list of available accounts.
If no account is selected, your default account will be used.
Select the contact you would like to send to.
If your contact/recipient has signed up for Interac Autodeposit, you will need to acknowledge that a security question is not required for the recipient to accept the funds by checking the box.
Add the amount you want to send by entering it in the amount field.
Optional: Enter a message for recipient (ie. Lunch money, rent…).
Select the Continue button to confirm and review your transfer details.
- If your details are correct, select the Continue button to complete the transfer.

- If you have a dual-signature setup, the message "This step was successful. For the transaction to be completed, it requires additional approval." will be displayed.

Accept an Interac e-Transfer®
- Select the money transfer or e-Transfer link received via text message or email.

- Select Manitoba from the Province dropdown, and select Access Credit Union from the Credit Union dropdown.
Then, select the Deposit button to proceed.
Two options will be presented: “Open in app” or “Open in mobile website.”
- When “Open in mobile website” is selected, you will be directed to the online banking login screen. Enter your credentials to log in.

- After logging in, you will be prompted to enter the answer to your security question.
Once entered, select the Accept button to continue.
- Deposit the e-transfer to the desired deposit account.
Then, select the Continue button to proceed.
- Review your details, then select the Continue button to proceed.

Cancel an Interac e-Transfer®
- From the My Access page, open the Transfers & Payments dropdown menu using its label.
Select History option under Interac e-Transfer® to view your transaction records.
- Select the Cancel icon associated with the e-Transfer you want to cancel.

- Select the Continue button to proceed.

- Review your details, then select the Continue button to proceed.

Set up Interac Autodeposit
With Autodeposit, money you receive via Interac e-Transfer® can be automatically deposited into your account without the need to respond to a security question.
You can add up to five email addresses for Autodeposit. Each email can be used for a single account.
To set up Autodeposit:
- From your Access Credit Union online banking, open the Transfers & Payments menu. In the Interac e-Transfer® section, select Autodeposit settings.

- Select the Add Autodeposit button.

- From the Register with dropdown menu, select whether you would like to use your mobile number or email address for Autodeposit.
Important: Double-check to ensure you entered your email or mobile number correctly.
Select an Account you would like your received e-Transfers to deposit into automatically with the associated mobile number or email address above.
Check the box to acknowledge the Autodeposit terms, then select the Continue button to proceed.
- Review your details carefully, then select the Continue button to complete the process.

- You will be prompted to enter an authentication code for dual authentication.
This code will be sent to the mobile number or email address associated with your account.
Enter the authentication code you receive, then select the Continue button to complete the setup.
- You will also receive a message from Interac via your designated Autodeposit number or email to verify your registration for the service. Click the Confirm button in the email to verify.
Going forward, e-Transfers to your designated mobile number or email address will be deposited automatically into your selected account without the need to accept or answer a security question.
Office Banking Features
View and export transactions
- In the Accounts category, select the View Transactions option from the list.

- Select the account you would like to review transactions for from the account list.

- To customize the transaction list by date range and/or transaction type, select the Filter icon.

- After entering the desired Date Range and Transaction Types, activate the Filter button to display the filtered transactions.
To navigate between pages, use the previous and next page controls. These may be represented by “<” and “>” symbols.
- To print the transactions list, select the Print icon.

- To export the transactions to another format, select the Export button.

- Select the format you would like to export the transactions to using the available options:
-
- CSV
- Microsoft Money
- PDF
- Quickbooks
- Quicken
- Sage 50
- Xero
Then activate the Export button to complete.
- CSV

View, save, and print eStatements
- Under the Accounts category, select View eStatements.

- Select the account you would like to view eStatements for from the available options.
Note: accounts may be consolidated into one eStatement.
- Select the dropdown menu associated with the year you wish to view. Then, select the desired month from the list to open the corresponding document.

- The eStatement for the selected month will appear. You can save or print it using the labeled options.

Make Tax Payments
- From the My Access page, navigate to the Transfers & Payments dropdown menu.
- Select Pay corporate taxes from the Payments section.
- Scroll to Corporation Tax Amount Owing Remittance (RC 159) select Add account.
- Enter the Business number and select Continue button.
- Confirm account details and select Continue button.
- Account successfully added.
- Navigate to the Transfers & Payments dropdown menu and select Pay corporate taxes from the Payments section.
- Scroll down to Account and select the logo under File/Remit.
- Select the account you would like to pay from.
- Add Contact name, fiscal period end date, payment amount and payment date.
Note: the Contact name you enter must match the Business name and cannot exceed 35 characters. - Click Continue button.
- Confirm tax details and click Continue button.
- Tax successfully paid.
Business members may be experiencing challenges connecting their QuickBooks application to Xpress online banking. A new app feature is being released in 2022 that will address these challenges.
Until then, we’ve included some resources for members to reference who are using Intuit platforms.
Settings & Security
Reset Password
- On the Online Banking Sign in screen, select Forgot username or password.

- Select Reset password option.

- Enter your username.
Enter your mobile number used in enrollment for you to receive the code.
Then select Continue button.
- Check your phone for the one-time authentication code. Enter the code in the provided field.
Enter your new password in the designated field.
Then re-enter the same password to confirm, and select Continue button.
- Password is reset. Continue to sign in.

Retrieve Username
- On the Online Banking Sign in screen, select Forgot username or password.

- Select Recover username from the available options.

- Tap the dropdown menu labeled Select identification method, then choose your preferred method—email or SMS—for receiving your one-time password.

- Enter the email address or mobile number associated with your account, then select Continue button to receive your one-time password.

- You will be asked to enter a one-time security code. After entering the code, select the Continue button to proceed.

- Enter your password in the provided field, then select the Continue button to proceed.

- Once complete, your username will be sent to your provided contact.

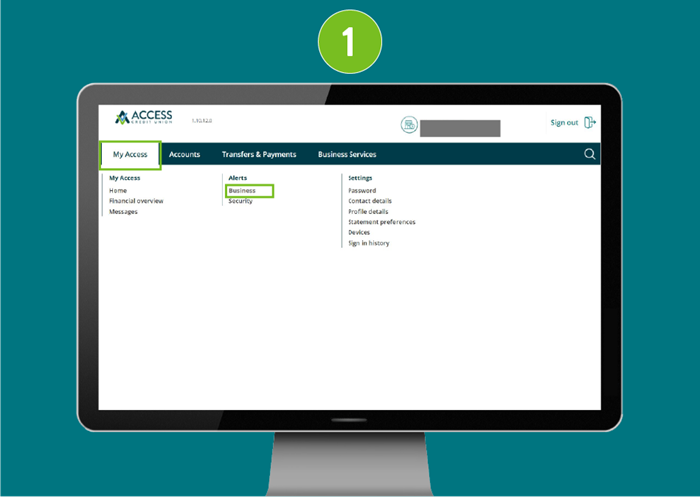
Set up alerts
Business alerts
Business alerts allow you to monitor specific accounts so you can track activities like withdrawals, your account balance, insufficient funds and failed transactions.
- From the "My Access" dropdown menu select Business under Alerts.
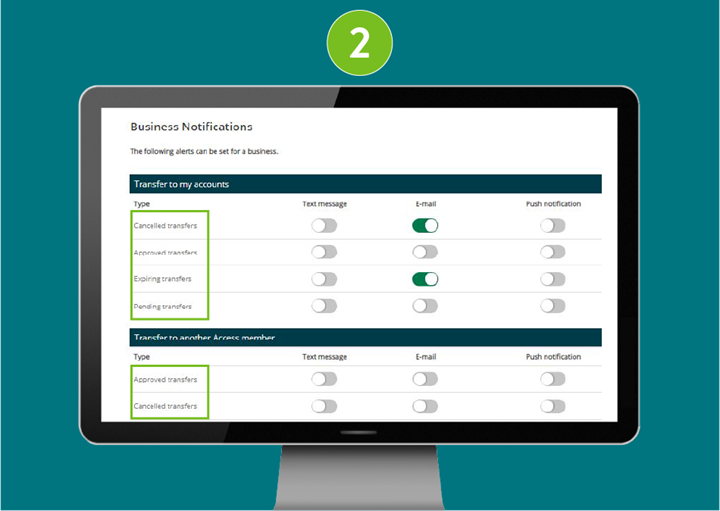
- Find the Transaction Type(s) you would like to set up the alert for (ex. each time a transfer is cancelled).
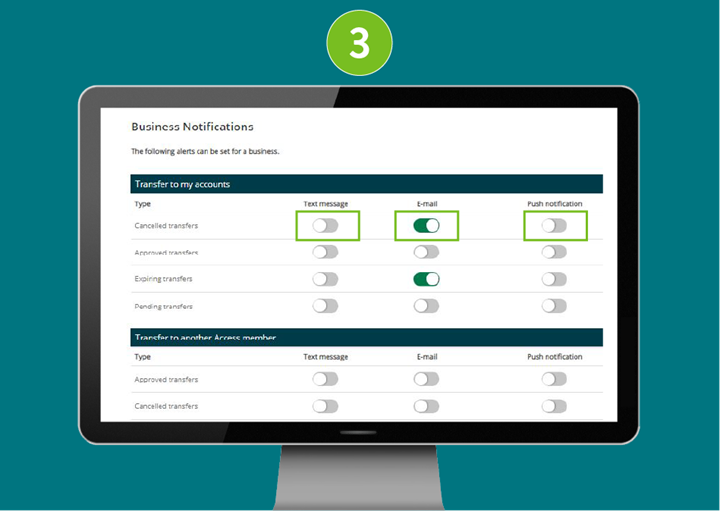
- Select the method(s) with which you would like to receive alerts. (Note: Ensure your contact information on your profile is up to date, as the alert will be sent to that specific method of contact.)
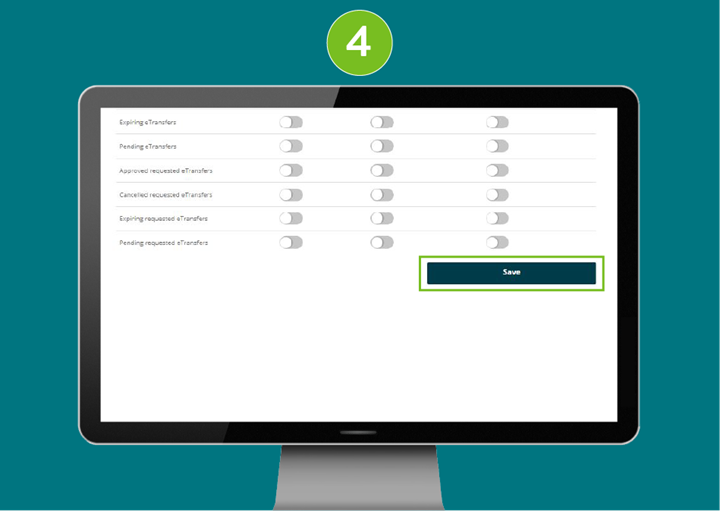
- Tap the Save button to complete the Account alert set up.
Security alerts
Security alerts will inform you of any changes to your profile including a password change or a login attempt.
- From the "My Access" dropdown menu select Security under Alerts.

- Find the specific category for which you would like to set up a security alert.
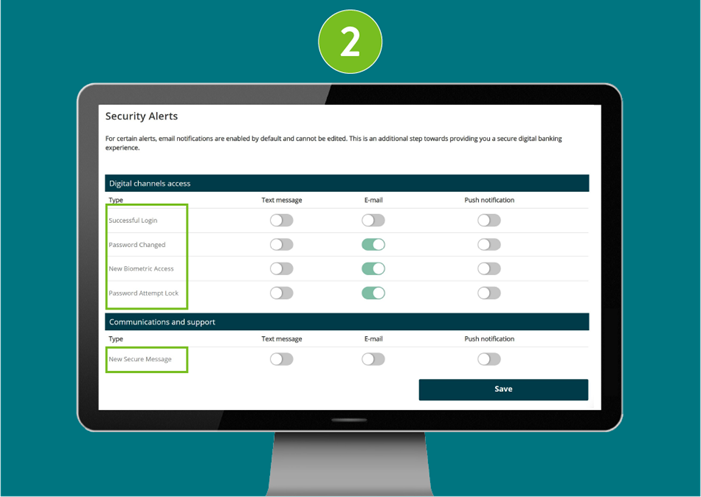
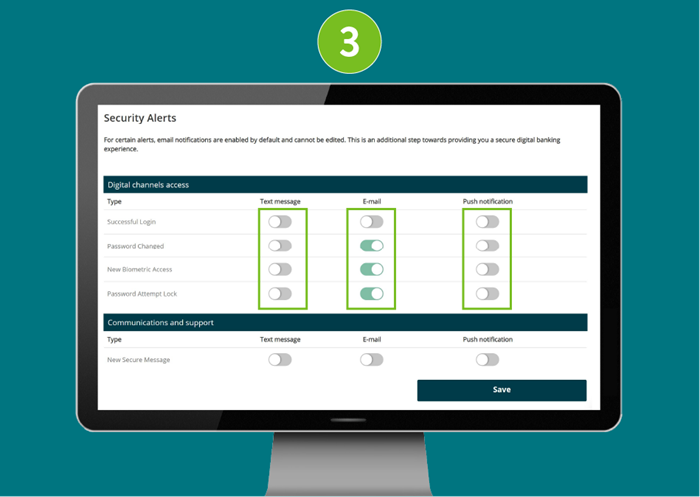
- Select the method(s) with which you would like to receive alerts. (Note: Ensure your contact information on your profile is up to date, as the alert will be sent to that specific method of contact.)
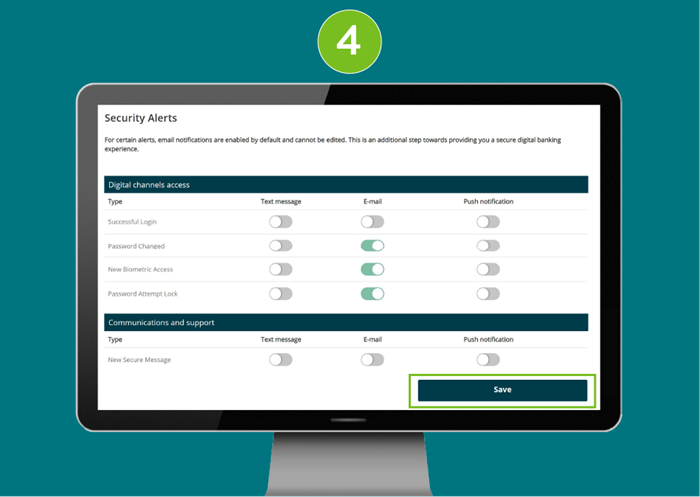
- Tap the Save button to complete the Security alert set up.
How to use Business Digital Banking on the App:
Getting Started on the Mobile App
![]()
Getting Started on the Mobile App
Learn how to log in to the mobile app for the first time and customize your mobile banking experience.
Mobile App Transactions
![]()
Mobile App Transactions
Learn how to send and schedule transfers, bill payments, and Interac e-Transfers®, as well as view and manage transactions (including dual-signature), set favourites, and view eStatements.
Mobile App Office Banking
![]()
Mobile App Office Banking
Learn how to check your statements on the mobile app.

Mobile App Settings & Security
![]()
Mobile App Settings & Security
Learn how to reset your password and set up alerts.
Getting Started on the Mobile App
Logging in to the new Business Digital Banking for the first time.
As a signer, you’ll need to log in to digital banking using the steps outlined below. If your business has more than one signer, each signer will need to log in and create their own username and password.
Log in to your account via MOBILE BANKING APP:
iOS (Apple devices):
The Apple app will need to be updated manually if you do not have automatic updates set up.
If you do have automatic updates set up and this isn't working for you, please delete the app and re-download. You can find the app by searching "Access CU" in the app store or by using this direct link.
Android
The mobile app is available in Google Play at this direct link.
TIPS:
Ensure you select the Access Credit Union app with our logo mark:
Please help other members find the app by rating/recommending it to earn more visibility in search rankings.
- Sign in using your current business login credentials (that’s the 16 or 19 digits on your business debit card and your Personal Access Code or password).
Then, activate the Continue button to proceed.
- A welcome screen is displayed. Scroll down.

- Enter your date of birth using the date picker control. This may be labeled as Date of birth or presented as a calendar icon, depending on your device or app settings.
Choose to provide either your mobile phone number or email address, and enter it in the appropriate input field.
Select the Confirm button, then activate the Continue button.
- Select your new username and password.
IMPORTANT: Please note that once you’ve selected a username, it cannot be changed. Be sure to verify that your username is appearing correctly before continuing.
- The guidelines for your unique username are:
- minimum 5 characters
- maximum 34 characters
- cannot be your debit card number
- cannot be your email address
- can use uppercase letters, lowercase letters, numbers, and/or the underscore and period (_ .) special characters
*If there is another member in our system with the same username, it will be rejected and you’ll have to select a new one.
Choose a unique password using the following criteria:
- Alphanumeric
- Minimum 10 characters
- Maximum 35 characters
- 1 uppercase letter
- 1 lowercase letter
- 1 number
- 1 symbol (this is not displayed on the password indicator but is allowed)
- dash -
- underscore _
- period .
- alias symbol @

- Alphanumeric
- The guidelines for your unique username are:
- Re-enter your password.
To proceed, check the box labeled “I have read and accept the Direct Service Agreement.”
Then, select the Continue button.
- Confirm you details and select Create business user profile button.

- Your user profile is now set up. Select Proceed to Sign In button to continue.

And you’re all set! The next time you come back, simply use your new username and password to sign in.
Customize your app experience by changing your image at login! To add a profile picture:
- Login to the app. Then, select the icon labeled Profile to continue.

- Select Customize pictures to continue.

- You can choose to customize your profile and background pictures. Use the button labeled Take picture to capture a new photo, Add photo to upload an existing image, or Reset to remove your current selection.

- Adjust your profile or background image as needed, then select the button labeled Save to apply your changes.

Repeat steps 3 and 4 to change both your profile and background picture. - Your picture(s) will be saved and show up immediately on the app.

Looking for other ways to customize your app? Check out Settings & Security.
Mobile App Transactions
Deposit a cheque
Remote cheque deposit is available via mobile app only.
- Login to the app. Then, select the button labeled Mobile Deposit to continue.

- Select the account you want to deposit the cheque into by using the dropdown or list labeled Account. Then, enter the cheque amount in the Amount input field.

- Select the button labeled Camera to take a picture of the front of the cheque. For best results, place the cheque on a plain, dark background to help the camera capture the details clearly.

- The camera will open automatically. When it does, manually take a picture of your cheque by positioning it within the frame and pressing the camera button.

- Repeat the process to take a picture of the back of the cheque.

- Select the Continue button to proceed to the next step.

- Review the entered information for accuracy. Then, select the Continue button to proceed.

- A message will confirm, 'Deposit was successfully completed.' Then, activate the button labeled Done to return to the dashboard.

Transfer to a member
- Login to the app. From the main screen, select the Move Money option in the navigation bar. It’s grouped with other main actions like Accounts and Activity.

- Select Transfer funds option.

- Select the account you want to transfer funds from. This is typically a dropdown or list labeled "Transfer from".
Choose the option labeled Another Access CU member. This appear as a radio button in the "Transfer to" section.
Enter the member account number in the input field.
Enter the amount you wish to transfer in the field labeled Amount.
- Select the Transfer type from the list of options.
Optional: Enter a message for the recipient, such as “Lunch money” or “Rent.”
Then, activate the Continue button to proceed.
- Review the transfer details, then select the Continue button to proceed.

- To complete this transaction, enter the authentication code sent to your email or mobile phone number.
Then, select the Continue button to proceed.
- Transfer successfully completed.

Send a transfer
- Login to the app and select the Transfers button to continue.

- Choose the account you want to transfer from using the account selection list.
Then, choose the account you want to transfer to.
Enter the transfer amount in the Amount field.
-
Select the Transfer type: Immediate, Scheduled, or Recurring.
- If you choose Scheduled, select the Transfer date and optionally enter a memo.
- If you choose Recurring, enter the Start date, select the Frequency, choose the End date, and optionally enter a memo.
When you're ready, select the Continue button to proceed.
- Review the transfer details displayed on the screen.
If everything is correct, select the Continue button to proceed.
- A confirmation that the transfer has successfully been completed will be displayed.

Set Up Favourite Transactions
Easily set a favourite transaction to use again.
To set up a Favourite Transaction:
- Immediately after completing a transaction that you would like to add to your favourites (ex. transfer from Chequing to Savings), select the 3-dot icon in the.

- Select the Add to Favourites button.
This button may be represented by a heart icon, depending on your device or app version.
- Enter a name for your transaction in the Name field.
Then, select the Continue button to proceed.
- Your transaction is now saved as a Favourite and you can view it from the Dashboard.

To view and use current Favourite Transactions:
- You can view your favourite transactions from the Favourites section on your Dashboard.
Select the transaction you want to complete.
- Select the More options button, which represented by a three-dot icon.

- Select the Use icon.

- Review the transaction details to ensure they are correct.
Then, select the Continue button to proceed.
- Select the Continue button again to complete the transaction.

Add a Bill Payee
- Login to the app. From the main screen, select the Move Money tab from the navigation bar. It is grouped with other main actions such as Accounts and Activity.

- From the Move Money screen, select the Payments button.

- Select the Manage Payees button from the Move Money screen.

- From the Manage Payees screen, select the Add Payee button. It may appear as a + icon, but is labeled for screen readers as Add Payee.

- Search for a payee by name using the field labeled Search for a payee by name. After entering the name, review the list of results and select the correct payee by choosing the option labeled with their full name.

- In the field Payee Account Number, enter the account number for the payee.

- Review the payee’s details for accuracy. Then, select the Continue button to proceed.

- This type of transaction requires an authentication code, which is sent to your registered email address or mobile phone number. Enter the code you received in the text field labeled Enter Code, then select the Continue button to proceed.

- Payee successfully added.

Send or schedule a bill payment
- Login to the app. From the main screen, select the Pay Bills button to continue.
- Choose which account you would like to pay a bill from, then select the Add Payment button.
- Select Pay To and choose a recipient. Enter the Amount, then select the Date of Payment using the calendar tool.
- To pay the bill today, select the current date from the calendar. To schedule it for another day, choose a different date.
- Select Add payment button.
- If you want to add another payment, you can use the Add Another Payment button before selecting Continue to pay multiple bills at once.
- Once all bill payments have been added, select the Continue button and confirm the payment.
Set up a recurring bill payment
- Login to the app. From the main screen, select the Pay Bills button to continue.
- Select Recurring Payments button. The default account will be selected automatically, so make sure to choose the correct Pay From account if needed.
- Select a Payee Name using the Pay To dropdown menu, then enter the Amount in the field provided.
- Select the Frequency of Payment, then choose the Start Date and End Date using the calendar tool. Finally, select the Continue button.
- Confirm your payment details, then select the Continue button.
- Payment successfully scheduled.
Approve Pending Transactions
If you have your membership set up as requiring two-signer approval for transactions like bill payments and Interac e-Transfers®, you can approve the transaction within the mobile app.
- Login to the app and activate the Activity option in the navigation bar.
- Select Business Services option.
- Activate the Pending Transactions option.
- Select the transaction you would like to view from the list.
- Navigate to the Approve button to confirm the transaction, or the Decline button to cancel it.
Add Interac e-Transfer® contact
- Login to the app and activate the Move Money option in the navigation bar. t’s grouped with other main actions like Accounts and Activity.
- Select the Interac e-Transfer® button from the top navigation bar.
- Select the Manage Contacts button.
- Select the Add button (represented by a + icon).
- Enter the contact’s Name, Email or Mobile Phone, and Security Question. Then select the Continue button.
- Confirm the contact details, then select the Continue button.
- An authentication code has been sent to your email or mobile phone. Enter the code you received, then select the Continue button.
- Your contact has been successfully added.
Send Interac e-Transfer®
- Login to the app. From the main screen, select the Interac e-Transfer® option from the navigation bar.
- Select the account you would like to transfer funds from.
If no account is selected, your default account will be used.
Select the contact you would like to send money to.
If your contact is registered for Interac Autodeposit, you will need to acknowledge that a security question is not required. Do this by selecting the checkbox provided.
Enter the amount you want to send.
Optional: Enter a message for recipient (ie. Lunch money, rent…).
Select the Continue button. - Review the transfer details, then select the Continue button again to confirm.
- Transfer successfully sent.
Accept an Interac e-Transfer®
You can receive Interac e-Transfer notification via text message, email, or both.
- Select the Deposit Your Money link from the message you received by text or email.
- On the deposit page, select Manitoba as your Province, then choose Access Credit Union from the Credit Union dropdown menu.
- Select Open in app.
- Enter the Security answer then tap Accept button.
- Deposit the e-Transfer to the desired deposit account.
Optional: You can enter a message to deliver to the sender
Select the Continue button. - Review the transfer details, then select Continue button again to confirm.
Cancel an Interac e-Transfer®
- Login to the app. From the main screen, select the Move Money tab from the navigation bar. It is grouped with other main actions such as Accounts and Activity.
- From the main screen, select the Interac e-Transfer® option from the navigation bar.
- Select History button.
- Select the Pending transactions tab.
- Select the transaction you want to cancel from the list by tapping its name or details.
- Activate the button represented by three vertical dots and select the Cancel option.
- Confirm you have selected the correct transfer and press Continue.
- E-Transfer successfully cancelled. Select Done button to finish.
Set up Interac Autodeposit
With Autodeposit, money you receive via Interac e-Transfer® can be automatically deposited into your account without the need to respond to a security question.
You can add up to five email addresses for Autodeposit. Each email can be used for a single account.
To set up Autodeposit:
- Login to the app. From the main screen, select the Move Money tab from the navigation bar. It is grouped with other main actions such as Accounts and Activity.
- Select Interac e-Transfer ® option from the navigation bar.
- Press Autodeposit settings button.
- Select the Add button (represented by a + icon) to set up a new Autodeposit.
- Enter your details:
Choose whether you would like to setup an email or mobile phone number.
Type your email address or mobile phone number into the input field Email or Mobile Phone.
Choose the account you want to set up by selecting it from the list of available accounts.
Select the checkbox labeled I acknowledge to confirm your agreement.
Select Continue button. - Review your Autodeposit details to ensure they are correct. If everything looks accurate, select the Continue button to proceed.
- This type of setup requires an authentication code, which is sent to your registered email address or mobile phone number. Enter the code you received in the text field labeled Enter Code, then select the Continue button to proceed.
- Setup is almost complete. Next a confirmation link will be sent to either your email or mobile phone.
- Open up the confirmation email or text you received and select the button or link labelled Complete registration.
- You are now setup for Autodeposit.
Going forward, e-Transfers to your designated mobile number or email address will be deposited automatically into your selected account without the need to accept or answer a security question.
Mobile App Office Banking Features
View eStatements
Viewing eStatements on mobile is currently only available on IOS.
-
- Log in to the app. From the main navigation bar, select the Activity option to view your recent transactions.
- Select the button labeled View eStatements to access your electronic statements.
- Choose which eStatement account you would like to view by tapping on the box under Select an eStatement account.
- Choose the year of the eStatement you want to view by selecting an option from the Year field.
- Select the month you want to view.
- Log in to the app. From the main navigation bar, select the Activity option to view your recent transactions.
Mobile App Settings & Security
Set up alerts
Learn how to set up account/security alerts for everyday banking on the mobile app.
Business alerts
Business alerts allow you to monitor specific accounts so you can track activities like withdrawals, your account balance, insufficient funds and failed transactions.
- Login to the app and activate the More tab from the navigation bar. It is grouped with other main actions such as Move Money and Activity.
- Select Alert Settings button.
- Select Business alerts button.
- Find the Transaction Type(s) you would like to set up the alert for (ex. each time a transfer is cancelled).
- Select the method(s) with which you would like to receive alerts.
Note: Ensure your contact information on your profile is up to date, as the alert will be sent to that specific method of contact. - Activate the Save button to complete the Account alert setup.
Security alerts
Security alerts will inform you of any changes to your profile including a password change or a login attempt.
- Login to the app and activate the More tab from the navigation bar. It is grouped with other main actions such as Move Money and Activity.
- Select Alert Settings button.
- Select Security alerts button.
- Select the type of alert you would like setup.
- Choose how you would like to get notified for the alert. Either Text message, E-mail, or Push notification.
- Activate the Save button to complete.
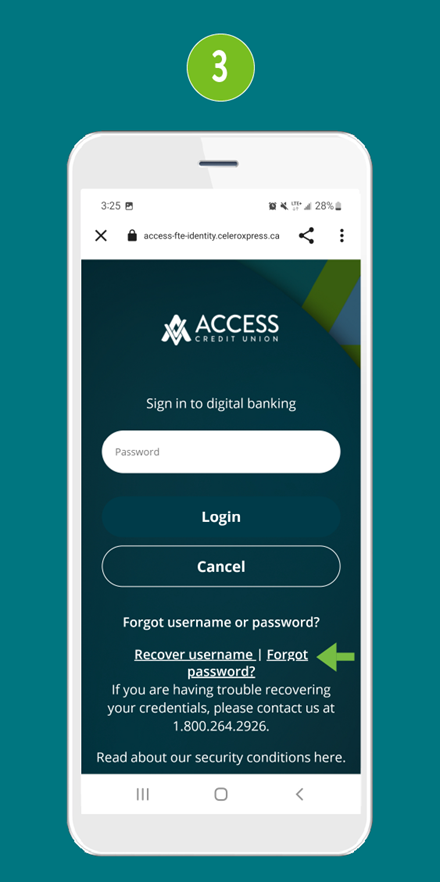
Reset your Password
- On the app sign-in screen tap Sign in.
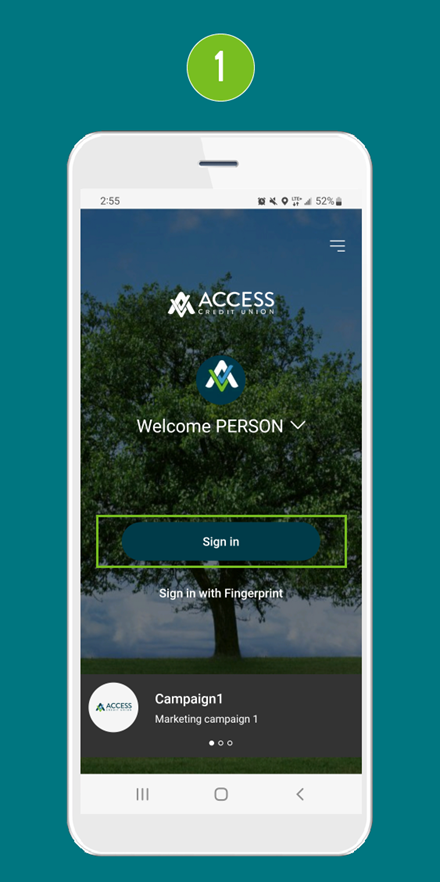
- Select Forgot username or 'password?'.

- Press 'Forgot password?'.
- Enter your username and mobile phone number.
Tap Continue.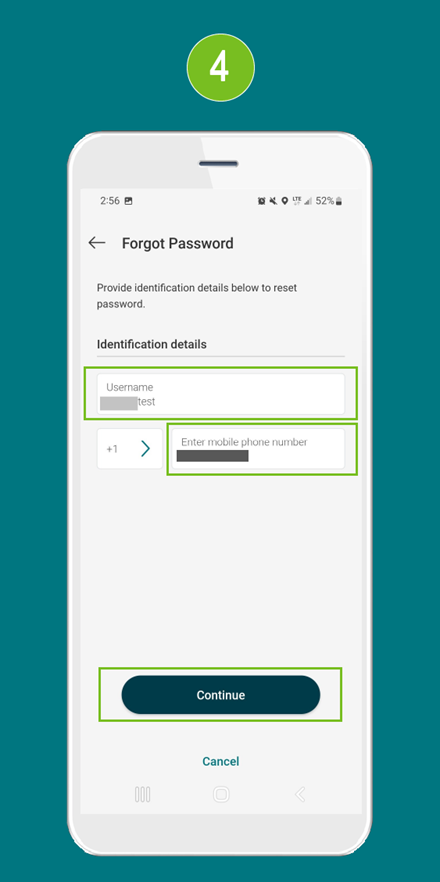
- This requires a one-time password sent to your mobile phone. Enter the code you received by text into the box.
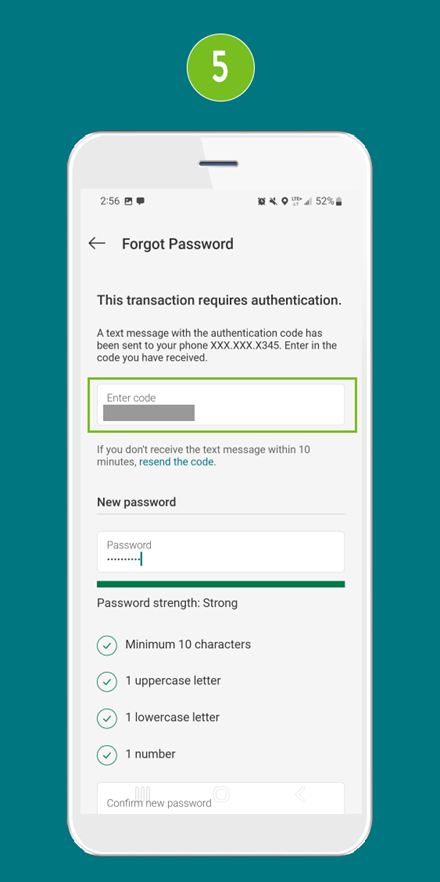
- Enter your new password and then re-enter it again below under Confirm new password.
Tap Confirm.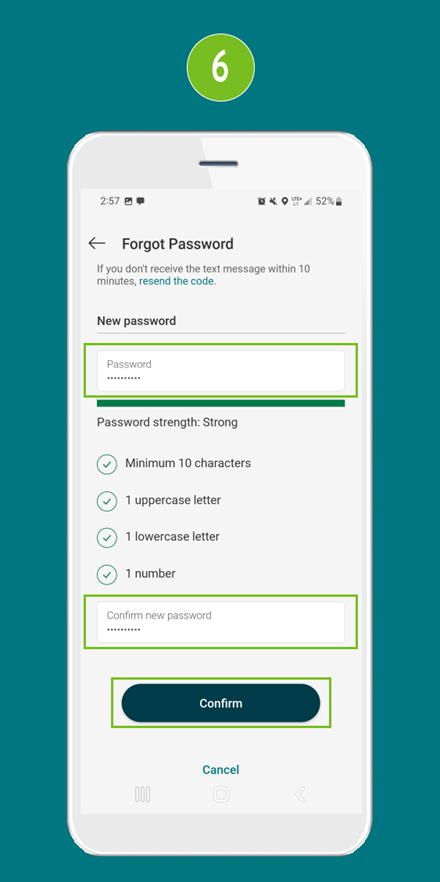
- Your password has been successfully reset. Please go back to login again with your new password.

The consolidation feature works a little bit differently with the new system and you won’t be able to view your consolidated memberships until you have completed a few steps. You will have to start by completing your initial sign in for each membership separately. Once you have completed the onboarding process for all your memberships, you can then consolidate them as required. Once you have completed this step, you will be able to sign in once, and switch between any of your consolidated profiles as needed.
Signers vs. Delegates
There are two main roles in Business Digital Banking: Signers and Delegates.
Signers
Signers are people who have all authority on accounts. They have signing authority for all of their business banking needs. Examples of tasks available for signers:
- open new accounts
- add delegates
- approve transactions
- pay bills
- transfer funds
Only signers are able to update contact information, create delegates, and sign up for alerts. Using online banking on your browser, you can edit delegate details and access.
Delegates
Delegates are individuals assigned by signers to either initiate transactions or have read-only access to record and report business finances. Your delegates do not need to be Access Credit Union members.
NOTE: Delegates do not have authority to make changes or inquire with credit union staff about accounts.
There are two types of delegates:
Initiator Delegates
Users with this role may or may not be members of Access and have limited authority on accounts. All transactions ‘initiated’ by these delegates must be approved by the applicable number of signers. Examples of tasks:
- pay bills
- transfer funds
- prepare financial statements
- reconcile statements
Read-Only Delegates
Users with this role are employees and/or family members who only need access to view specified accounts, but cannot transact or initiate transactions. Examples of tasks:
- prepare financial statements
- reconcile statements
One person who has signing authority for the accounts will create a username for the delegate when adding them to the membership. After this, a temporary password will be sent to the signer to enter into the system. Once the delegate is set up, they will use their new sign in information and they will be prompted to create their own unique password the first time they sign in.
Delegates can initiate transactions, but not authorize or complete them. If the business account requires two approvals, the delegate can create a transaction, and then two signers will have to sign in to approve it.
No! You can set up as many delegates as you like.
If you have your membership set up as requiring two-signer approval for transactions like bill payments and Interac e-Transfers®, you can approve the transaction within digital banking.
- Sign in to digital banking
- From the menu, click Business Services > Review Pending Transactions
Note: You can sign up to receive alerts when there is a pending transaction requiring approval. Please note that transactions expire after seven days.